Why You'll Love This Recipe
- Quick and easy to prepare
- Packed with fresh flavors
- Customizable ingredients
- Perfect for healthy meals
Intro and Brief Recap
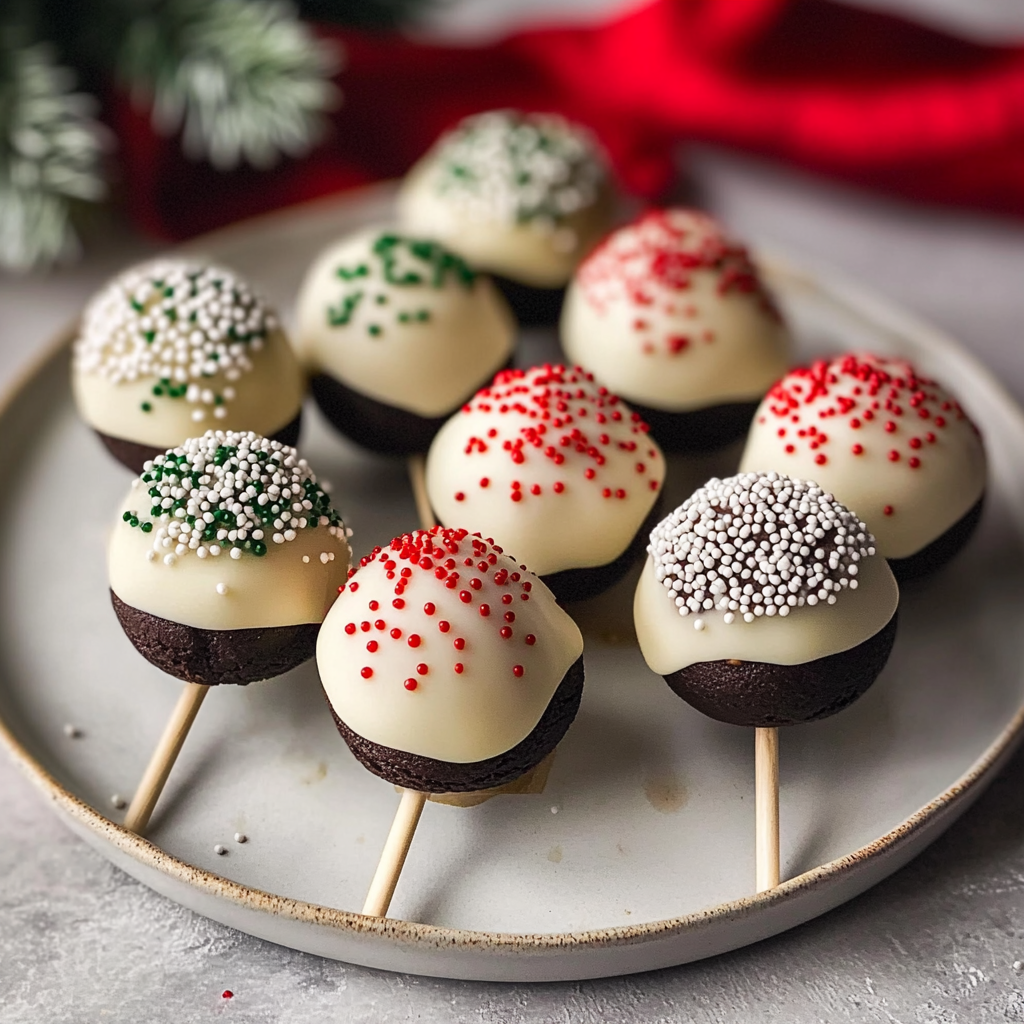
Have you ever tasted a dessert that instantly transports you to a festive wonderland? Christmas Ornament Oreo Pops Tasty are just that—a delightful treat that combines the rich flavors of chocolate with the fun of creative decoration. These pops are not only visually stunning but also incredibly easy to make, making them perfect for holiday gatherings or as a sweet gift for loved ones.
As the holiday season approaches, anticipation fills the air. The aroma of melted chocolate mingles with the sweetness of crushed Oreos, invoking memories of joyful celebrations and cozy family moments. Imagine presenting these adorable, colorful pops at your next holiday party, instantly captivating your guests. With their crunchy texture and creamy filling, every bite offers a satisfying crunch followed by rich chocolate goodness. Get ready to indulge in this festive treat that promises to elevate your holiday festivities!
Key Ingredients For Christmas Ornament Oreo Pops Tasty
Here’s what you’ll need to make this delicious dish:
-
Oreo Cookies: Use regular or double-stuffed Oreos for the best flavor; they provide a crunchy texture and rich chocolate taste.
-
White Chocolate Melts: These will be used for coating the pops; choose high-quality melts for a smooth finish.
-
Sprinkles: Use various colors and shapes to decorate your pops; they add a festive touch and fun texture.
-
Popsicle Sticks: Select sturdy sticks that can hold the weight of the Oreo pops without breaking.
-
Candy Eyes: Optional but recommended for adding personality to your Christmas ornament design.
The full ingredients list, including measurements, is provided in the recipe card directly below.
Instructions For Christmas Ornament Oreo Pops Tasty
Follow these simple steps to prepare this delicious dish:
First Step: Crush the Oreos
Begin by placing your Oreo cookies in a food processor. Pulse until you achieve fine crumbs. This process should take about 20-30 seconds.
Second Step: Melt the Chocolate
In a microwave-safe bowl, melt white chocolate melts according to package instructions, stirring every 30 seconds until smooth and creamy. This will take approximately 1-2 minutes.
Third Step: Combine Mixtures
In a large mixing bowl, combine the crushed Oreos with half of the melted chocolate. Mix thoroughly until all crumbs are coated with chocolate.
Fourth Step: Form Pops
Using your hands, form small balls with the mixture—about one inch in diameter—and insert a popsicle stick into each ball. Place them on a baking sheet lined with parchment paper.
Fifth Step: Coat with Chocolate
Dip each formed pop into the remaining melted white chocolate, ensuring they are fully coated. Allow excess chocolate to drip off before placing them back on the parchment-lined sheet.
Sixth Step: Decorate
While the chocolate is still wet, sprinkle your chosen decorations on top. If using candy eyes, gently press them into place before letting everything set.
Transfer to plates and enjoy these delightful Christmas treats!
Expert Tips
Here are some helpful tips to ensure the best results for your dish:
-
Use Quality Ingredients: High-quality white chocolate melts will yield smoother and tastier results.
-
Chill Before Coating: Refrigerate shaped pops for about 15 minutes before dipping to keep them from falling apart.
-
Experiment with Flavors: Consider adding peppermint extract or flavored melts for an extra twist on this classic recipe.
Presentation Ideas
This Christmas Ornament Oreo Pops Tasty is versatile and pairs wonderfully with:
-
Festive Platters: Arrange your Oreo pops on a beautiful holiday platter. Use seasonal decorations like pine cones, holly, or even fairy lights to enhance the festive spirit. This display will not only look appealing but also serve as a delightful centerpiece for any holiday gathering.
-
Gift Wrapping: Wrap individual Oreo pops in clear cellophane bags tied with colorful ribbons. These make perfect homemade gifts for family and friends during the holiday season. Personalizing each gift with a little tag adds a special touch that everyone will appreciate.
-
Holiday Treat Table: Create a dedicated table for treats at your holiday party. Include your Christmas Ornament Oreo Pops Tasty alongside other festive desserts like gingerbread cookies, peppermint bark, and festive cupcakes. This setup will encourage guests to indulge in a variety of sweets while enjoying the cheerful atmosphere.
Tips for Making Perfect Oreo Pops
To create the ultimate Christmas Ornament Oreo Pops Tasty, follow these essential tips:
Start with high-quality ingredients. Opt for fresh Oreos and premium chocolate or candy melts to ensure the best flavor and texture. Melt the chocolate slowly over low heat to avoid burning it; stirring frequently helps achieve a smooth consistency.
Use food-safe sticks that are sturdy enough to hold the weight of the dipped Oreos without breaking. Ensure that you insert them halfway into each cookie for better stability during coating.
Allow your decorated pops to cool completely before serving or packaging. Room temperature is ideal for setting the chocolate without condensation forming on them.
Storing Your Oreo Pops
Proper storage enhances both freshness and flavor in your Christmas Ornament Oreo Pops Tasty:
Keep your pops in an airtight container at room temperature if you plan to consume them within a few days. For longer storage, refrigerate them in an airtight container to maintain their quality.
Avoid stacking the pops directly on top of each other unless separated by parchment paper, as this prevents smudges and maintains their decorative finish. If stored correctly, these delicious treats can last up to two weeks!
Creative Variations
Explore various creative variations of Christmas Ornament Oreo Pops Tasty by trying different flavors and decorations:
Consider using flavored Oreos like mint or pumpkin spice for unique twists on traditional recipes. You can also dip them in white chocolate and add colored sprinkles or edible glitter for a dazzling effect.
For an extra crunchy texture, roll the coated pops in crushed nuts, coconut flakes, or cookie crumbs after dipping but before letting them set.
Experimenting with different toppings allows you to personalize each pop according to your taste preferences or party theme!
FAQs
What are Christmas Ornament Oreo Pops Tasty?
Christmas Ornament Oreo Pops Tasty are delightful dessert treats made by dipping Oreo cookies into melted chocolate or candy melts, then decorating them to resemble festive ornaments. These pops are not only visually appealing but also deliciously sweet, making them perfect for holiday parties and gatherings. They can be personalized with various toppings such as sprinkles, edible glitter, or crushed candy canes. The combination of rich chocolate and creamy filling from the Oreos creates a treat that is sure to please both kids and adults alike during the holidays.
How do I make my Christmas Ornament Oreo Pops Tasty look more festive?
To enhance the festive appearance of your Christmas Ornament Oreo Pops Tasty, consider using vibrant colored candy melts that reflect traditional holiday colors like red, green, gold, and silver. After dipping the pops in chocolate, add sprinkles or nonpareils before they set for added texture and color. You can also use melted white chocolate to drizzle over your pops in swirling patterns which adds elegance and visual interest. Finally, attaching small bows made from ribbon at the base of each stick gives an adorable finishing touch that captures the holiday spirit beautifully.
Can I customize my Christmas Ornament Oreo Pops Tasty?
Absolutely! Customizing your Christmas Ornament Oreo Pops Tasty is part of the fun! You can change up flavors by using different varieties of Oreos—think peanut butter or birthday cake flavors—for a unique twist on this classic treat. Additionally, you can experiment with various types of coatings including dark chocolate or yogurt-covered options. For decoration, use themed candies that match your holiday décor or party theme—this allows each pop to reflect personal style while still being deliciously irresistible!
How long do Christmas Ornament Oreo Pops Tasty last?
When stored properly in an airtight container at room temperature, Christmas Ornament Oreo Pops Tasty can stay fresh for about 5-7 days. If you want them to last longer—up to two weeks—refrigerate them but be cautious as refrigeration may affect their texture slightly due to moisture changes upon removing from cold conditions. Always ensure they are kept away from direct sunlight or heat sources which could cause melting issues with both chocolate coating and cream filling inside!

Christmas Ornament Oreo Pops
- Total Time: 40 minutes
- Yield: Makes approximately 10 pops 1x
Description
Indulge in the festive spirit with these delightful Christmas Ornament Oreo Pops! Combining the rich flavors of Oreos and smooth white chocolate, these charming treats are perfect for holiday gatherings or as sweet gifts. Easy to make and customizable, they are sure to be a hit among family and friends. With vibrant colors and fun decorations, each pop offers a satisfying crunch followed by creamy goodness, making them an irresistible holiday treat.
Ingredients
- 1 package (15.35 oz) Oreo cookies
- 2 cups white chocolate melts
- 1 cup assorted sprinkles
- 10 popsicle sticks
- Optional: 1 cup candy eyes
Instructions
- Crush Oreos in a food processor until fine crumbs form.
- Melt white chocolate in a microwave-safe bowl, stirring every 30 seconds until smooth.
- Combine crushed Oreos with half of the melted chocolate; mix until well coated.
- Form mixture into 1-inch balls and insert popsicle sticks into each ball. Place on parchment-lined baking sheet.
- Dip each pop into remaining melted chocolate, allowing excess to drip off.
- Decorate with sprinkles and attach candy eyes if desired before letting them set.
- Prep Time: 30 minutes
- Cook Time: 10 minutes
- Category: Dessert
- Method: No bake
- Cuisine: American
Nutrition
- Serving Size: 1 pop (45g)
- Calories: 180
- Sugar: 15g
- Sodium: 50mg
- Fat: 8g
- Saturated Fat: 5g
- Unsaturated Fat: 3g
- Trans Fat: 0g
- Carbohydrates: 25g
- Fiber: 1g
- Protein: 2g
- Cholesterol: 0mg